How to get good 3D models from photogrammetry
Introduction
Photogrammetry can give you excellent 3D models with a very low budget. In this tutorial I talk about setting up a low budget ‘turntable’ photogrammetry setup and best practices for successful scans. The tutorial is a result of many try and error attempts and the best practices describe the final techniques I arrived at. Generating a good photoscan means walking a fine line, but if done well, the reconstructed 3D models are of high quality and give your own modeling needs a huge jump start by providing excellent base models.
All you have to do for a photogrammetry scan is to take pictures of an object from as many angles as possible and then feed all these pictures into a software that reconstructs the object in 3D space. You can walk around an object and take the pictures by hand or you rotate the object and keep your camera fixed. The second method is commonly refered to as turntable method. There are of course many pitfalls and things to remember for a successful scan, and this is what I will focus on.
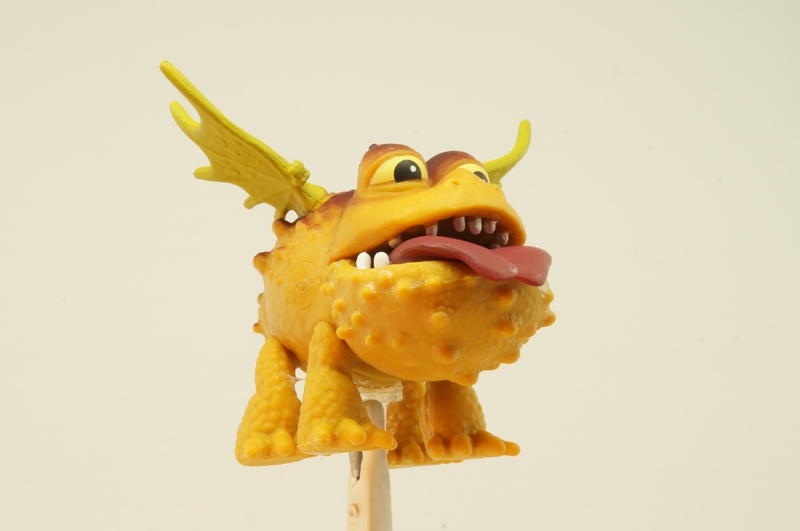
The pictures below show my tutorial object, a Dragons figure from the toybox of the kids. The left picture shows a photo of the real figure as taken in a light tent (see setup section), the middle picture shows a screenshot from inside Agisoft Photoscan and the right picture the setup that I use. The SketchFab link shows the as-exported Agisoft Photoscan model (see Software section) with just the Albedo map.

Model Preparation
Photogrammetry works by finding the same features in different photos and reconstruct their underlying geometry by tracking the relative motion of the features. This is what Agisoft Photoscan will do for you. Taking the photos is your part.
There has to be some texture on the surface in order for Agisoft to find features. A blank single-colored surface will not do, neither will transparent objects. Should you still want to scan such objects for their geometry, for example a glass bottle, the best solution I found is using a granite decorative spray and apply it on the surface. It does not have to be applied to fully cover the surface like the cap in the picture, but instead it is enough to apply short bursts covering your surface with lots of small grains that can be tracked by Agisoft Photoscan. Sometimes you read that spraying the surface white and scratching it with black markers helps too, but the granite spray is much easier to use and its pattern provides a lot of features for Agisoft to track, resulting in excellent geometry reconstruction.
Specular objects also do not work well because the texture blended with the reflection appears different under different angles making it difficult for Agisoft to track features. Here you can use a polarization filter in front of your camera lens to lower some of the reflections, but another far more effective method to use on top of that is a matte spray. Matte sprays are used for product photography to turn reflective surfaces non-reflective. Spray it on your object and it will greatly reduce reflections. Both the matte spray and the polarization filter made it possible for me to scan otherwise highly reflective objects.
Holders are recommended to mount your models so that you can look at their bottom side as well with the camera. I just glued a little pin on the belly of the dragon. This pin is later grabbed by the cube mount, as described in the next section. You will lose a tiny area of the belly, but this is easily modeled out later on in your 3D modeling application.
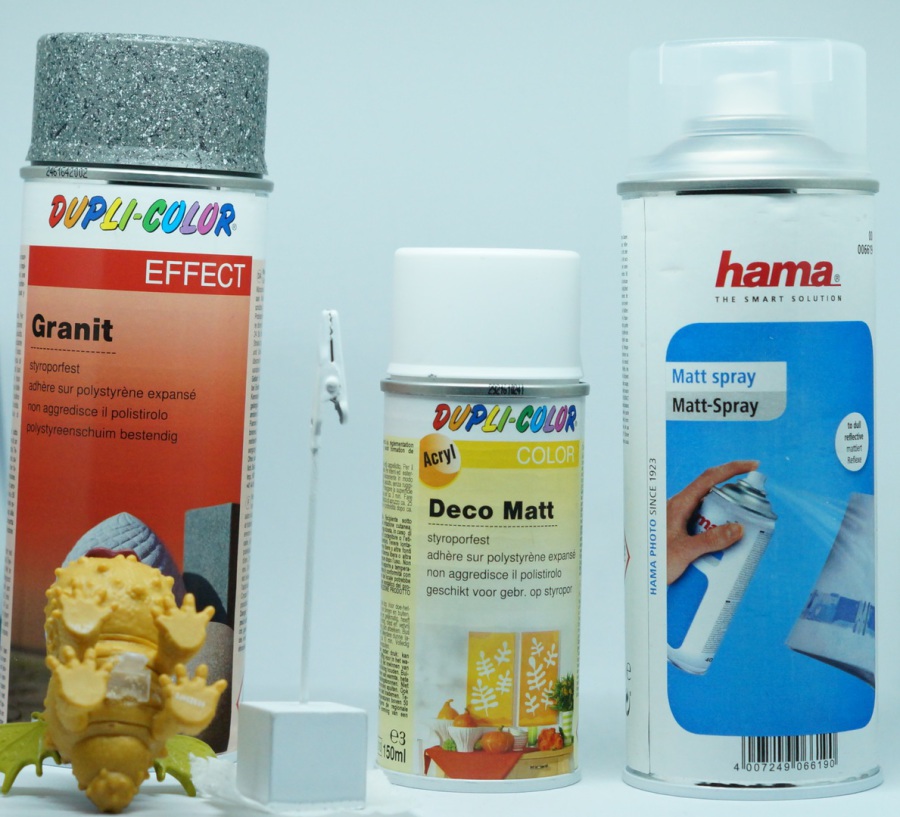 Photogrammetry helpers: Granite Spray left, White Matte Spray middle, Anti-Reflection Matte Spray right, Grab Holder with cube base, pin at model belly to be grabbed
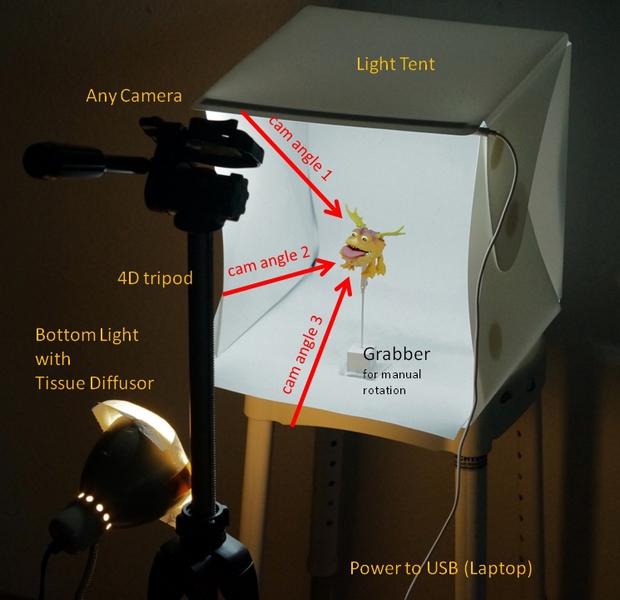
Setup and Scanning
The main component of the setup is a light tent to evenly light your model and to avoid strong shadows that wander over your texture as you rotate the model. After some research I found the Amzdeal light tent (see equipment summary) the best. It has one LED line on top and gives a good brightness. To light the bottom as well a bit better, I use a simply desk lamp with some tissue in front as a diffuser. The light tent comes with white, blue and green insets and as a result your photographs will have no textured background at all. This completely eliminates the need for masking later on in the Agisoft photoscan software. Strong static background pattern would otherwise ruin your photoscan.
Any camera can be used in principle. I have a Sony Alpha and use this with a tripod that can be moved in up/down direction as well to conveniently gather angles from above and below. You will need a small aperture (high f-number) to avoid any depth of field issues because Agisoft needs sharpness. The high f-number results in long exposure times. With my Sony Alpha I used 1.5seconds. Therefore a turntable can not be used to rotate the object because of motion blur. I turn it by hand in small steps. I do around 60 photos for a full 360° rotation, and this for one angle below, one above and one looking straight at the object. It sounds maybe cumbersome, but it is just a matter of 10mins really and looking at how many days/weeks you save with a well scanned 3D model it is definitely worth the time. I also use a remote trigger for my camera because of the long exposure times. When taking pictures, really make sure they are sharp and best have the model always in the center as if the camera pivots around it. Using resolution as high as possible to retrieve details is also recommended. I use 4k photos and jpeg with my camera. On top of that raw images could be used, but I am happy with the jpeg and their result.
As holders I use simple note holders for medium size objects. The note holder‘s clamp grabs the pin described in the model preparation section. The note holders are really slim and do not block any camera view. For larger models I use, very simple again, a slim cylindrical bottle with some double sided tape on top to keep the model fixed. This is really low budget, but does an excellent job. I also have white spray to turn the holders white if I want and have them blend in the white light tent background. This avoids them being detected by Agisoft. On the other hand, you could also paint the holders with any texture and have them detected and reconstructed with your model. Agisoft photoscan has really good tools to easily cut them out later on.
On top of all that, you could also use diffuse spheres to capture the light distribution in your light tent. This allows delighting, i.e. removing shadows, later in your 3D modeling application. McBeth Color Checker targets can also be used to correct your colors. Both are optional. (https://www.unrealengine.com/blog/imperfection-for-perfection)
Software
After you took all photos it is time to fire up Agisoft Photoscan or the photogrammetry software of your choice. I use Agisoft and it gives me really good results by just using the out-of-the-box workflow without any tweaking if I feed it my photos. For this tutorial I was importing the photos without any pre-processing like contrast enhancement or similar, which can give better results in some cases.
A breakdown:
1. Add Photos.
2. Align Photos, preferably with highest accuracy.
3. Generate Dense Point cloud, I use High here.
4. Remove outliers of Dense Point cloud with crop/delete tools. Worth doing it for good mesh.
5. Generate mesh and generate textures.
Done! This is just a few mouse clicks. I use the out-of-the-box settings for everything and it works just well.
Eventually you can close mesh holes in Agisoft and decimate the mesh, but this can also be done in your 3D modeling application. Also any texture painting, normal maps, specular maps and touch ups on your model geometry and so on can then be done in your 3D modeling application.
One very early indicator for a successful scan are the Agisoft cameras directly after the Step 2: Align Photos. The moment you see the Agisoft cameras being in near perfect circles around your object, you know you did a good job in your light tent and the result will make you smile. Should large chunks of the cameras be misaligned, but still be connected (for example one quarter or one half of the 360° circle is just misplaced), then disabling every second photo of that 360° circle for analysis helped. You can also have Agisoft Photoscan estimate the image quality and sort out photos with low quality (see manual). This can also save the scan should it be misaligned.
Getting there, as mentioned, took me endless try and error sessions and is really just a matter of your setup and the little things described above. It is very easy to miss this sweet spot and I believe it is what many call the art of photogrammetry. The screenshot with the near perfect Agisoft cameras was from another model - a toy car tire of around 1/2 inch size - and a screenshot of the reconstructed tire directly in Agisoft is shown below. It is remarkable how well the geometry is reconstructed. That would take very very long to model and texture all those details from scratch.
 Screen from inside Agisoft: Such near perfect camera reconstruction indicates a very good result early on
 Screenshot from inside Agisoft: Photoscanned 1/2inch toy car tire
3D models: The tire from above and also a chassis of a Quad that could be used with the tire
Equipment List
Light tent - 26 Euro
Any cheap desk lamp for below illumination 5-10 Euro (Ikea)
Holders with grabber - 9 Euro
Matte spray (optional) - 33 Euro
Granite spray (optional) - 14 Euro
White spray (optional) - 10 Euro
Agisoft Standard – 180 USD
http://www.agisoft.com/buy/online-store/
Any Tripod , Camera, Remote trigger